Updated on June 13, 2023
How to Cut and Install Vinyl Siding
The outside of your property betrays its age? Give it a youthful look by installing new vinyl siding. Vinyl panels are the number one choice, and for good reason: it’s budget-friendly, easy to install and maintain, in addition to being offered in a variety of colours and textures. Follow our step-by-step guide, which includes a list of required materials and tools.

Preparation and Instructions
Careful planning is fundamental when you replace a vinyl panel on your house’s exterior wall. For a seamless look and enhanced durability, the vinyl panels must be perfectly aligned in the corners, around windows and door frames.
Ensure that:
- Surfaces are flat and wood furring is solid.
- The protection barrier is intact.
- The flashing around the doors and windows is satisfactory: a minimum of 9” wide on all four sides, starting on the bottom, followed by the sides, and finishing with the top of the window.
- The soffit moulding is installed.
Nailing tips:
- Centre nails in slots, spaced at 12” to 16”.
- Drive nails in horizontally.
- Allow 1/32” between nail heads and vinyl to permit room for expansion and contraction caused by temperature fluctuations.
- Choose nails with heads 5/16” in diameter and shanks 1/8” in diameter.
- Leave ¼” gaps between siding pieces and trim and between butt ends of adjoining siding pieces.
Cutting tips:
- Across the width – use a utility knife with a retractable blade.
- Across the length – use snips.
- You can also use a circular saw with a fine blade.
Before you get started, look at the image below to familiarize yourself with the types of panels and mouldings as well as where they should be installed.

1Install Outside and Inside Corners
- 1.1Measure and cut each exterior corner moulding. The post should run from ¾" below the starter strip to ¼" below the soffit moulding.
- 1.2Position the corner moulding ¼" lower than the soffit moulding and place nails at the top of the uppermost nailing slot.
- 1.3Ensure corner mouldings are straight and plumb, then place the remaining nails in the centre of the slots at 8" to 12" intervals.
- 1.4If more than one length is required, make a splice: overlay the upper section over the lower section.
- 1.5Cut 1" off the nailing flange on the upper section, then lay ¾" of the upper section over the lower section.
- 1.6Close off the bottom of the corner moulding with a rivet or cut tabs and fold back towards the inside.
- 1.7Measure and cut each interior corner moulding. The interior post should run from ¼" below the starter strip to ¼" below the soffit moulding.
- 1.8Position the corner moulding ¼" lower than the soffit moulding and place nails at the top of the uppermost nailing slot.

2Install the Starter Strip
- 2.1Determine the lowest part of the wall that will be sided, close to the foundation of the house.
- 2.2Measure the width of the starter strip (between 2 ½" and 3½") and deduct ¼" from this measurement.
- 2.3Partly drive in a nail just above the wall at this height.
- 2.4Stretch a chalk line from this nail to a similar nail at the next corner. Be sure the line is level and snap the line.
- 2.5Repeat the same procedure around the entire surface to be sided, at the same height.
- 2.6Nail the starter strip directly on the chalk line around the house.
- 2.7Nail at 10" intervals directly into the centre of nailing slots.
- 2.8Allow a ¼" gap for expansion between the starter strip and corner post mouldings.
- 2.9Allow a ½" gap for expansion between sections of starter strip.
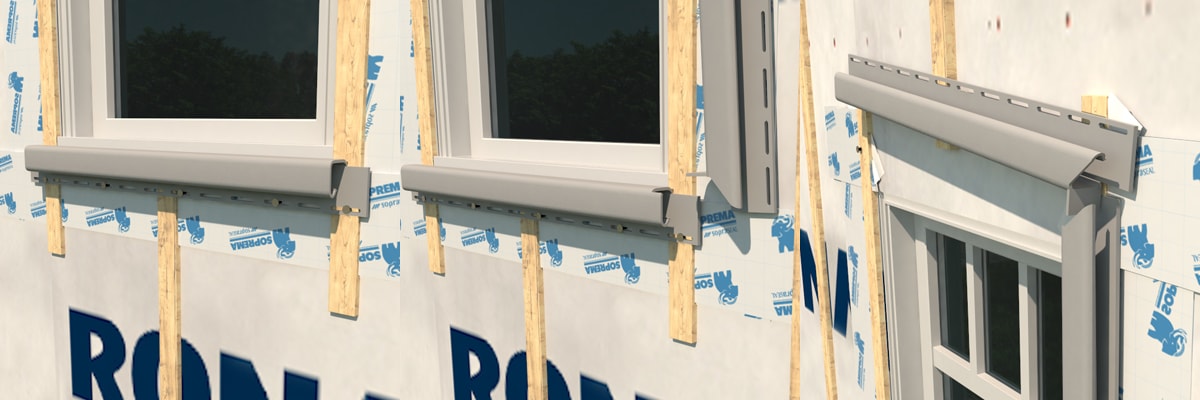
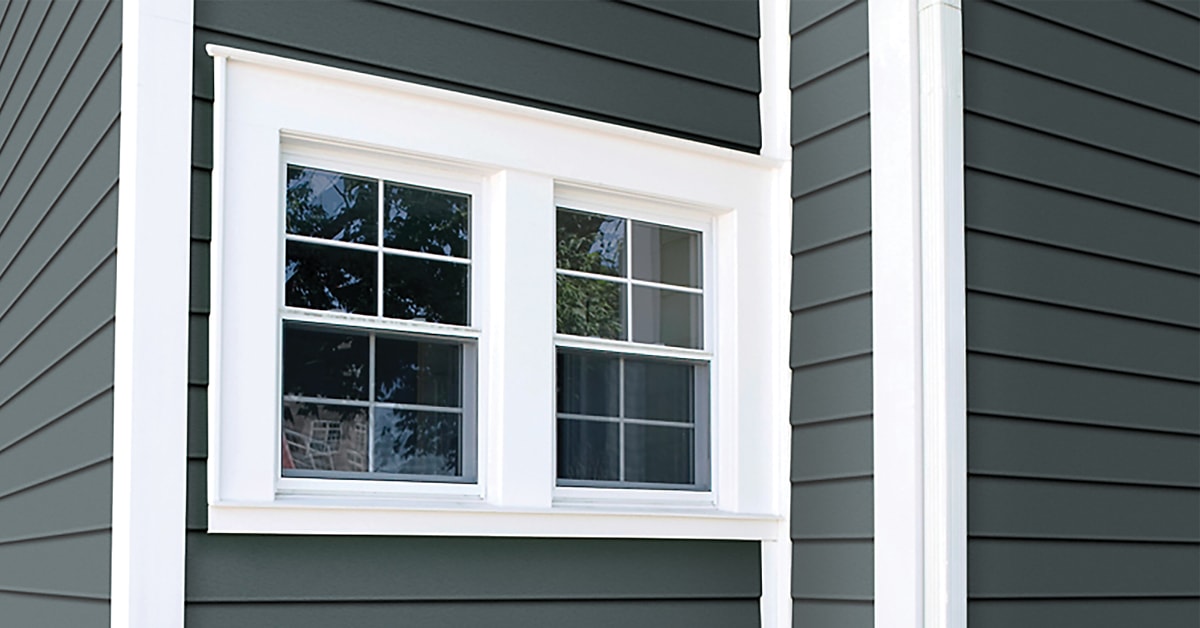
3Install Moulding Around Doors and Windows
- 3.1Measure the contour of the window.
- 3.2Cut the moulding for the bottom of the window 2" longer than the width.
- 3.3Cut a 1" notch on each side of the nailing flange, on the part that will rest on the sill, leaving the front part intact.
- 3.4Nail the moulding under each overhang, extending 1" on either side.
- 3.5Cut two pieces of J-moulding for the sides, 2" longer than the height of the window, and nail.
- 3.6Cut the J-moulding for the top, 2" longer than the width of the window. At each end, cut a 1" notch at the two bottom corners of the J-moulding and fold back the tabs to a 90° angle.
- 3.7Mitre the front of the J-moulding at a 45° angle towards the roof line. Nail into place.
- 3.8Tuck the tabs of the upper moulding in the notches of the two lateral mouldings to form a water run-off.
- 3.9Measure the contour of the doors and install the side mouldings. Finish with the top moulding.
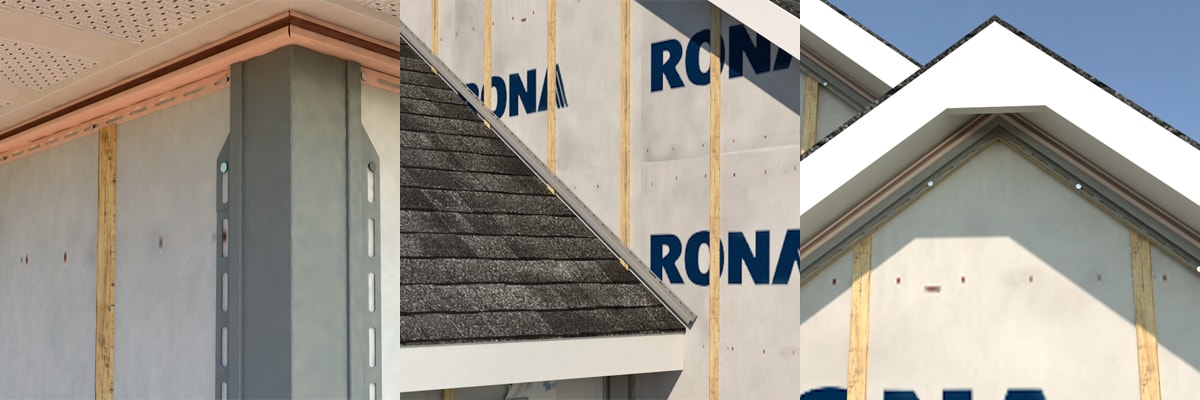
4Install the "J" Channel Mouldings
- 4.1Nail in J-moulding under the soffit mouldings.
- 4.2Install J-moulding along the gable angle against the soffit overhang. Make angled joins.
- 4.3Install J-moulding along sloping rooflines, ½" from asphalt shingles.
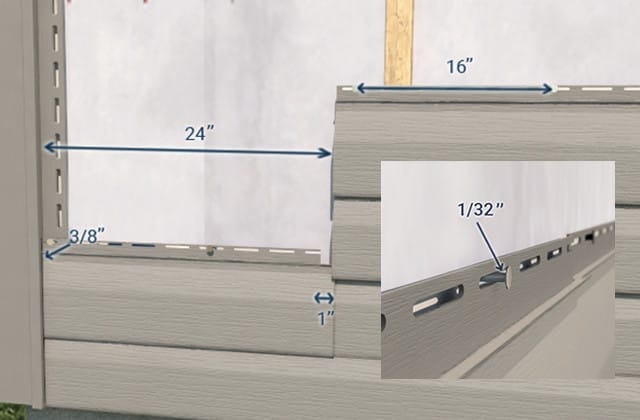
5Install Horizontal Panels
- 5.1Install the first siding panel on the starter strip over its entire length. Centre nails through slots and drive in straight.
- 5.2Insert the ends into corner post mouldings. Allow a ¼" gap for expansion.
- 5.3Snap the bottom of the panel into the starter strip before nailing.
- 5.4Do not exert pressure when nailing in panels. Allow 1/32" between the nail head and vinyl siding to permit expansion and contraction.
- 5.5Check for level using a chalk line. Siding should be lapped away from high-traffic areas.
- 5.6Overlap panels by 1". Nail at 6" from the ends.
- 5.7Stagger rows by 4’ so that joins will not be vertically aligned.
- 5.8Check for level every 5-6 rows. Never pull siding panels when nailing.
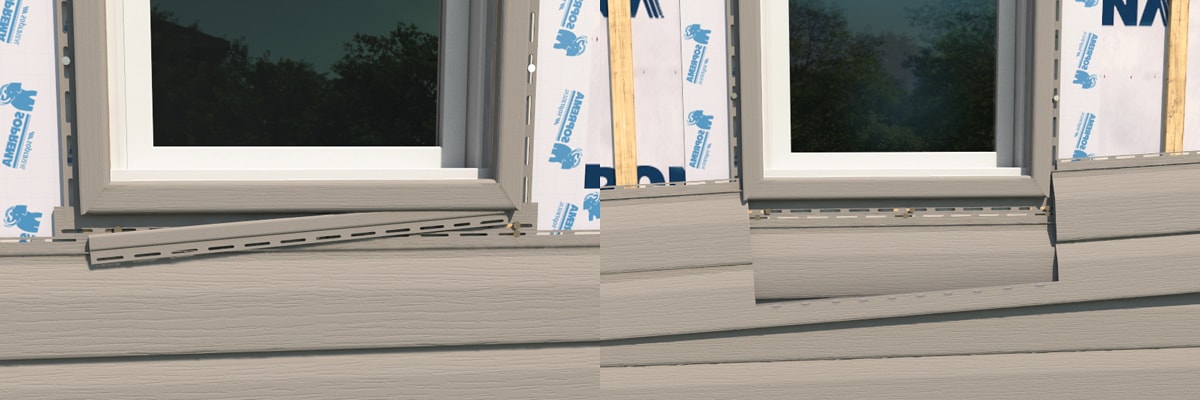
6Install Panels Around Windows and Doors
- 6.1Insert a piece of finishing moulding into the J-moulding under the edge of the window.
- 6.2Measure the distance between the lower edge of the interlocking grooves of the finishing moulding and the grooves and last panel.
- 6.3Add 5/8" to this measurement so that the edge of the panel can be inserted into the finishing moulding.
- 6.4Cut the top of the vinyl panel.
- 6.5Punch top panel with a snap-lock punch every 6" in the cut edge so that raised projections face out.
- 6.6Overlap the panel into the finishing moulding and then lock in the bottom edge.
- 6.7Install panels on both sides of the window.
- 6.8For the panel above windows and doors, measure the width and add 3/8" on either side.
- 6.9Cut the bottom of the panel.
- 6.10Slot the panel in under the J- moulding so it locks into position.

7Finish the Wall Tops
- 7.1If not already done, nail in J-moulding under the soffit moulding.
- 7.2Measure the distance between the top of the fascia board and nailing flange of the preceding panel, then subtract ¼" from this measurement.
- 7.3Cut the top of the panel.
- 7.4Punch top panel with a snap-lock punch every 6" in the cut edge so that raised projections face out.
- 7.5Insert the top of the panel into the J-moulding and then lock in the bottom edge.
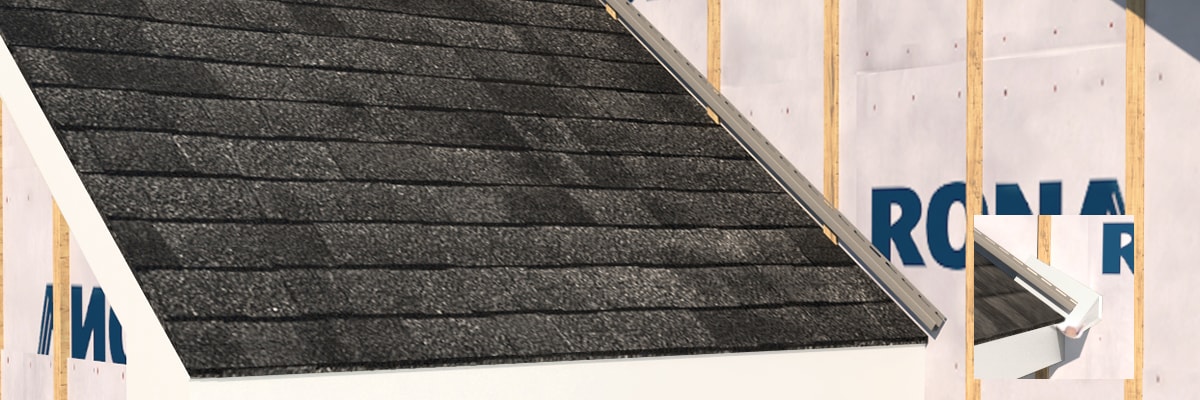
8Install Along a Sloping Roofline
- 8.1If not already done, nail in J-moulding ½" under the pitched roof.
- 8.2Nail in J-moulding on all roof edges.
- 8.3Slide kick-out flashing into the corner under the end of the J-moulding and asphalt shingles. Extend to divert rain water from the cladding far away from the wall.
- 8.4Install the vinyl wall panel so that the side edge is behind the kick-out flashing of the fascia.
- 8.5Install the following panels on the wall by inserting the bottom in the J-moulding of the roof.

9Gable End Installation
- 9.1Insert a small panel at the bottom of the gable to make a template for the cutting angle.
- 9.2Slide a piece, at an angle, into the J-moulding of the gable.
- 9.3Draw a line on the piece to indicate the slope.
- 9.4Install the vinyl panels in the gable using the cutting template.
- 9.5Use a snap-lock punch to make tabs every 6" in the cut edge. Raised projections should face out.
- 9.6Insert the upper panel into the J-moulding then lock in the bottom edge. Allow some space for expansion.
- 9.7Perfectly centred in the nailing slots, drive finishing nails into the last panel under the decorative lip.
Disclaimer
These DIY projects are provided for informational purposes only. The information contained in RONA’s DIYs is intended to provide general guidelines to simplify jobs around the house. Because tools, products, materials, techniques, building codes, and local regulations are continually changing, RONA inc. assumes no responsibility for the accuracy of the information contained herein and disclaims any liability for the omissions, errors, or outcome of any project. RONA inc. makes no representation on the feasibility of any project and the viewer bears all risks coming with the realization of the projects. It is the responsibility of the viewer to ensure compliance with all applicable laws, rules, codes, and regulations for a project. The viewer must always take proper safety precautions and exercise caution when taking on any project. If there is any doubt in regard to any element of a project, please consult a licensed professional.
Un projet?
Jetez un œil à notre solide sélection de matériaux de construction.

Got a project coming up?
Our building materials selection will have you hooked.

Install asphalt shingles
The new generation of asphalt shingles will not only improve the look of any roof but are long-lasting and easier to install than the old three-tab models.

Poser des bardeaux d'asphalte
La nouvelle génération de bardeaux d’asphalte a beaucoup à offrir en comparaison au modèle traditionnel à trois pattes.


