How-to install a solid and durable foundation shed foundation

Sheds are great for outdoor storage. Whether a pre-fab kit or built according to an original design, the garden shed must sit on a solid foundation. Learn how you can choose the type of foundation that is best suited to your terrain and how to build it. Make sure to buy the necessary material for the selected type.
Difficulty level: Intermediate
Duration: Week-end project
Material
For all types of foundations
Landscape fabric0-¾" Crushed stone

Wood stakes

String
On-grade foundation: concrete pavers
Cement and sand mixConcrete Pavers
On-grade foundation: timber frame
4" x 4" Pressure-treated woodSpikes or Lag screws
On-grade foundation: concrete blocks and lumber
2" x 6" Pieces of pressure-treated woodConcrete base
Permanent foundation: concrete piers and lumber
4" x 4" pieces of pressure-treated woodCardboard cylindrical form tubes ConcreteJ-Bolts with washers and nutsPost-base Hardware
Permanent foundation: concrete slab
ConcreteRebarForm-work timbersPlastic sheetingDuplex nails
Site preparation before building a shed foundation

Prepare the site

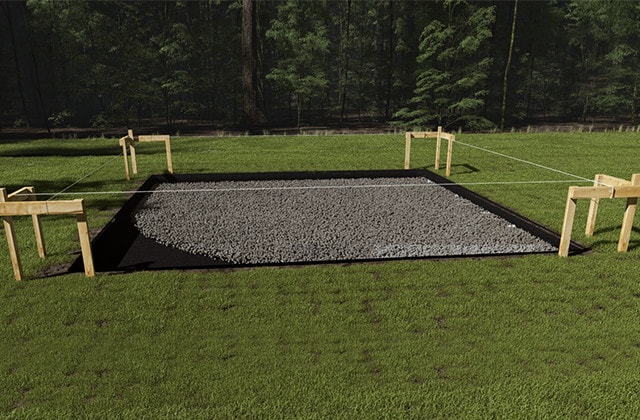
  • 1 - Use wood stakes and string to mark off the shed perimeter.
  • 2 - Use a line level to level the string.
  • 3 - Measure the distance between the wood stakes and ensure the diagonal measurements are the same length.
  • 4 - Excavate to a depth of 4".
  • 5 - Cover the surface with a geotextile membrane.
  • 6 - Fill in with 4" of gravel and compact with a mechanical compactor.
Shed foundation using concrete pavers

On-grade foundation: concrete pavers

Pros :
  • Simple and economical
  • Doubles as the shed floor
  • Ideal for level, compact ground

Cons :
  • Shed structures must be light and pre-assembled floors are excluded.
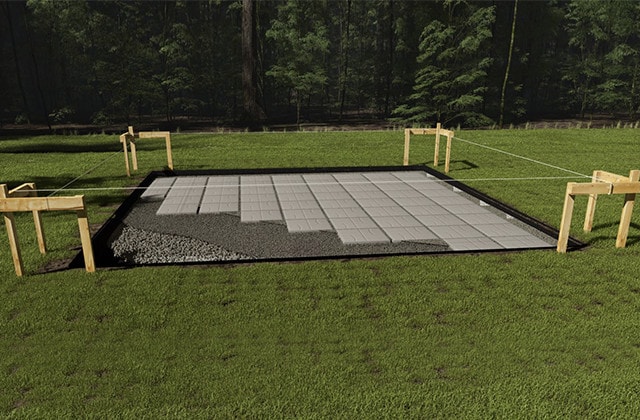
  • 1 - Pour a 1" layer of dry cement and sand mix (one part cement to eight parts sand) on top of the gravel. Level.
  • 2 - Lay down concrete pavers inside the perimeter. Start at one corner and leave a 1" gap between pavers.
  • 3 - Level and adjust each paver as necessary using a piece of wood and a rubber mallet.

Pro Tip

When building a backyard shed, level a foundation on a sloping grade using a combination of concrete blocks, pavers and gravel or insert a piece of 4" x 4" to elevate the structure.
Shed foundation using a timber frame

On-grade foundation: timber frame

Pros :
  • Simple and quick to install
  • Ideal for compact and level ground
  • Enables various flooring options
Cons :
  • Suitable for lightweight structures
  • Floor construction is required
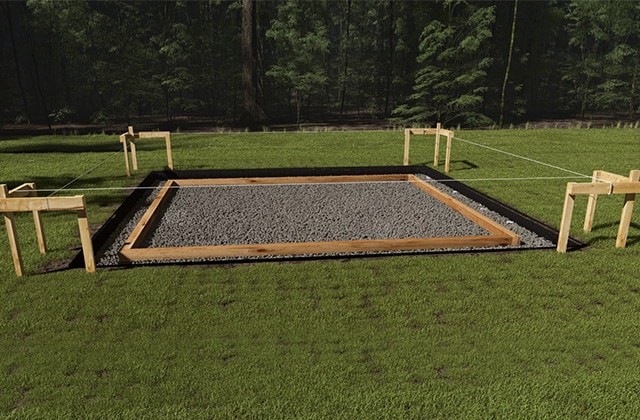
  • 1 - Cut 4" x 4" pieces of pressure-treated wood to the dimensions of the shed.
  • 2 - Join the pieces of wood by means of lap joints, or simply stack the pieces. Fasten together with landscaping spikes or lag screws.
  • 3 - Square the pieces of wood and level with shims.
  • 4 - Fill the space with gravel, concrete pavers, or any other filler material.
  • 5 - Compact.
Shed foundation using blocks and lumber

On-grade foundation: concrete blocks and lumber

Pros :
  • Easy to install and floor construction is simplified
  • Ideal for small structures on compact soil
  • Can accommodate gently sloping ground by inserting pieces of 4" x 4" to elevate the structure
  • Suitable for ground with low probability of frost heave
Cons :
  • May sag if soil is poorly drained
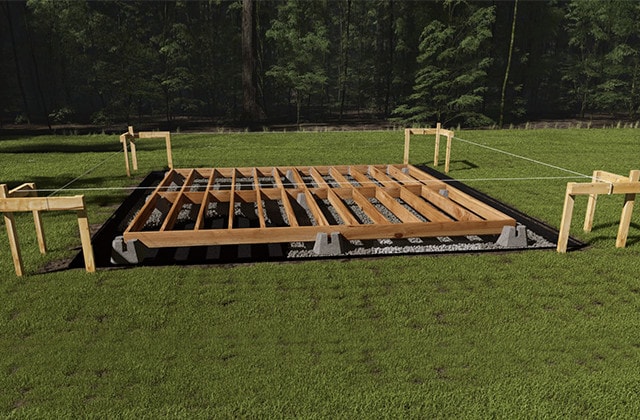
  • 1 - Set concrete blocks in each corner, aligned with the string.
  • 2 - Add concrete blocks to form three rows of three blocks. Add more blocks for a larger shed or if heavy equipment will be stored.
  • 3 - Ensure the blocks are square.
  • 4 - Lay 2" x 6" joists on each row of concrete blocks to form a frame.
  • 5 - Level each block independently, then all blocks with each other. If one block is too high, remove some material underneath; if it is too low, add some gravel.
  • 6 - Screw joists together to close the frame.
  • 7 - Ensure that it is level and adjust if necessary.

Pro Tip

An asphalt shingle makes for an excellent shim that holds up well to moisture and temperature changes.
Shed foundation using concrete piers and lumber

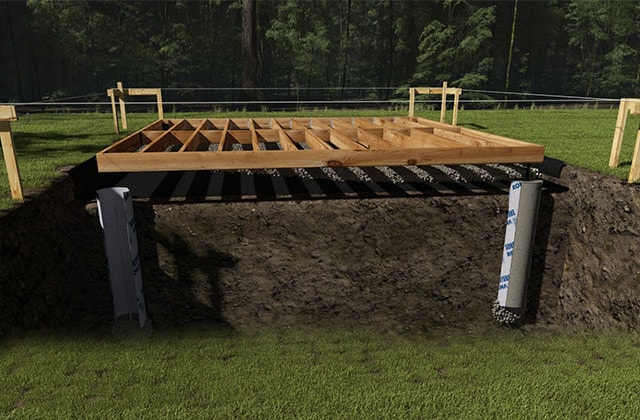
Permanent foundation: concrete piers and lumber

Pros :
  • Permanent, frost-proof foundation
  • Ideal for most types of soil and sloped terrain
  • Resistant to freeze-thaw conditions
  • Enables heavy equipment storage
Cons :
  • Floor construction is required
  • More expensive and longer to install
  • Digging below the frost line is required
  • 1 - Determine the exact location of the concrete piers so the outside edges of the 4” x 4” timbers are aligned with the string. As with the on-grade foundation with concrete blocks, at least 8 piers plus one in the centre will be necessary. Therefore, provide for a minimum of 9 piers.
  • 2 - Use a posthole auger to dig holes 10” to 12” in diameter and approximately 54” deep, depending on the area.
  • 3 - Pack the bottom of each hole and add a 6” layer of 0-¾” crushed stone for drainage.
  • 4 - Insert a cardboard form tube in each hole and cut to leave 6” above ground level.
  • 5 - Ensure that the form tubes are level with each other. Measure diagonal lengths to verify the foundation is square.
  • 6 - Backfill the exterior of the tubes.
  • 7 - Pour concrete into the form tubes.
  • 8 - Insert a steel bar into every form tube to reinforce the pier and minimize structural damage due to frost.
  • 9 - Insert the rods of the hangers in the centre of each pier and 1” of thread above the surface.
  • 10 - Level all hangers or J-Bolts to the same height.
  • 11 - If you used a J-Bolt: when the cement has dried, secure the post base hanger by orienting the side plates so that the pressure-treated 4” x 4” sits on top.
  • 12 - Repeat these steps for each pier in order to complete the foundation.
Shed foundation using a concrete slab

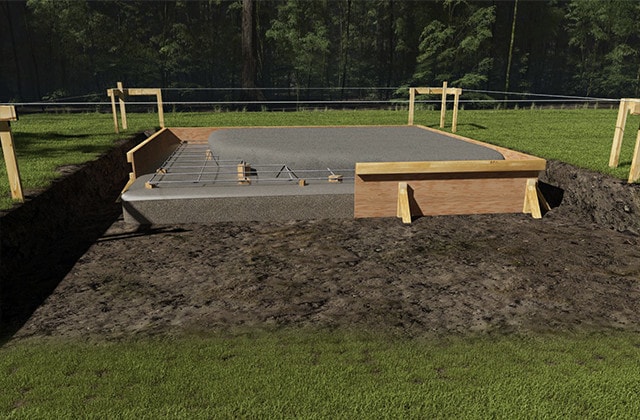
Permanent foundation: concrete slab

Pros :
  • Suitable for larger structures installed on level ground
  • Solid floor for storing heavy equipment
Cons :
  • Prone to move or crack due to seasonal freeze and thaw conditions
  • More expensive and complicated to install
  • 1 - Mark off the shed perimeter with wood stakes and string.
  • 2 - Use a line level to level the string.
  • 3 - Measure the distance between the wood stakes and verify that the diagonal measurements are of the same length.
  • 4 - Excavate to a depth of approximately 15". Do not cover with a geotextile membrane or gravel.
  • 5 - Build a solid and straight form-work around the perimeter using plywood and 2" × 3" pieces of lumber.
  • 6 - Nail a 2" x 4" foundation sill directly to the frame to be flush with the concrete slab.
  • 7 - Compact a bed of sand at the bottom of the form-work. Maintain a depth of at least 10" and width of 18" inside the perimeter. Gradually reduce to a depth of 5" at the centre of the slab. Use gravel for drainage, if necessary.
  • 8 - Cover the surface with plastic sheeting.
  • 9 - Cover the surface with a steel mesh to reinforce the concrete. Raise from the ground with pieces of concrete or rocks so that the reinforcing mesh will be imbedded in the centre of the concrete layer. When the concrete has been poured and has dried, the steel rods will be permanently sunk.
  • 10 - Pour concrete over the entire surface.
  • 11 - Level the surface by dragging a straight 2" x 4" over the concrete.
  • 12 - Push a bull float across the concrete to smooth the slab.
  • 13 - Smooth the edges of the slab with an edger and use a trowel for a smooth finish on the slab.
  • 14 - Use a groover to form control joints on the concrete surface to prevent cracks.

Suggested products