Install a sink and faucet on the bathroom vanity

The bathroom sink is the fixture that gets the most use, so a reliable, water-tight installation is important. You need to know your plumbing basics before installing a bathroom sink on a bathroom vanity, but otherwise this is not a complicated project. Patience and attention to detail will go a long way and some dexterity will come in handy as well, whether you are planning your bathroom renovation or undertaking new construction.

Before getting started

  • Turn off the water supply using the valves under the vanity.
  • If you don't have shutoff valves, shut off the water main, usually located in the basement.
  • Drain the pipes and collect the water by opening the siphon under the sink.
1

Make a cut in the vanity top to drop in the sink

  • 1.1 - Determine the location of the faucet and check the plumbing lines can be hooked up easily.
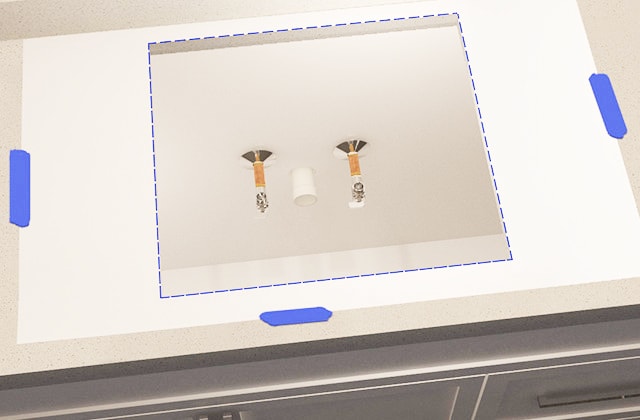
  • 1.2 - Attach the sink template to the counter, respecting the clearance specified by the manufacturer.
  • 1.3 - Trace the outline. If you don't have a template, put the sink upside down and trace the perimeter of the sink onto the countertop.
  • 1.4 - Remove the template, or the sink, and check that the pencilled outline is parallel to the edge of the counter. Adjust if necessary.
  • 1.5 - Drill a pilot hole ½" inside the cutting line.
  • 1.6 - Use a larger drill bit to enlarge the hole, enough to insert a 5/8" jigsaw blade.
  • 1.7 - Put masking tape around the cutting line to avoid scratching the countertop with the jigsaw and to prevent splinters.
  • 1.8 - Lower the blade into the hole and cut out the sink opening, taking care to follow the line.
  • 1.9 - Insert a shim into the opening while you are cutting to still the vibrations emanating from the section already cut.
  • 1.10 - If it is impossible to cut along the back of the sink from above the counter, cut from below. Trace a guide line before cutting.
  • 1.11 - Remove the cut piece of countertop and shims.
  • 1.12 - Lower the sink into the opening to check that it fits. Cut out more of the countertop if necessary.
2

Install the faucet

For most bathroom sinks, you must first install or replace the bathroom faucet and pop-up stopper assembly before inserting the sink in the counter.
  • 2.1 - Run a ¼" bead of bathroom silicone sealant under the base of the faucet.
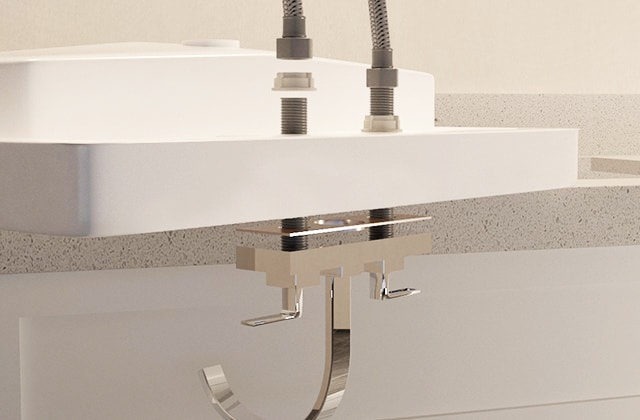
  • 2.2 - Insert the tailpieces (metal tubes) of the faucet into the mounting holes. The faucet base must be parallel to the back of the sink.
  • 2.3 - Press down firmly so the sealant adheres well and forms a watertight seal.
  • 2.4 - Screw the mounting and coupling nuts onto the faucet tailpieces.
  • 2.5 - Wrap thread seal tape around the exposed thread of the faucet tailpieces to ensure a watertight seal.
  • 2.6 - Tighten with a basin wrench or channel-type pliers.
  • 2.7 - Wipe away excess sealant from the base of the faucet.
  • 2.8 - Connect the flexible braided steel pipes to the faucet tailpieces.
Installing the bathroom sink stopper assembly
3

Install the stopper assembly

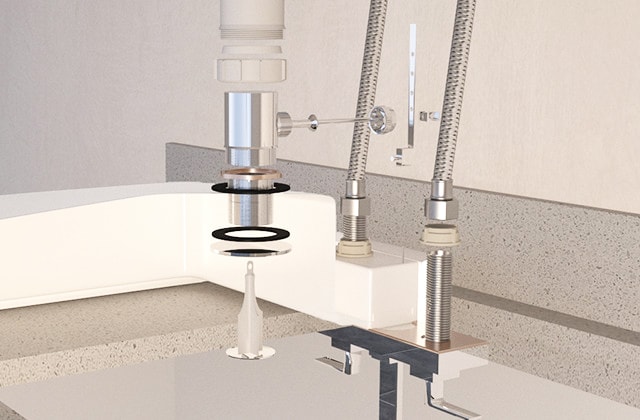
  • 3.1 - Wrap thread seal tape around all the threads of the ‘body' of the stopper.
  • 3.2 - Run a bead of silicone under the flange and place on the sink drain.
  • 3.3 - Insert the jamb nut and nylon washer up into the pop-up sink stopper assembly.
  • 3.4 - Screw the body of the stopper to the flange and ensure that the opening of the body is aligned with the pivot rod.
  • 3.5 - Insert the horizontal pivot rod in this hole. If necessary, turn the stopper until the rod is properly inserted.
  • 3.6 - Hand tighten the nut holding the rod in place.
  • 3.7 - Pull the stopper to the ‘open' position; the horizontal rod should point downwards.
  • 3.8 - Insert the vertical lift rod into the hole behind the faucet.
  • 3.9 - Assemble this rod to the perforated extension rod (clevis).
  • 3.10 - On the clevis, locate the hole closest to the end of the horizontal rod (the rod pointing downwards).
  • 3.11 - Pass the pivot rod through this hole, then block with the metal clip.
  • 3.12 - Pull on the rod to close the stopper; check the adjustment.
4

Install the sink and connect the drain

  • 4.1 - Run a bead of silicone sealant under the perimeter of the sink.
  • 4.2 - Lower the sink into the opening, pressing down firmly.
  • 4.3 - Check the stopper can be inserted into the drain.
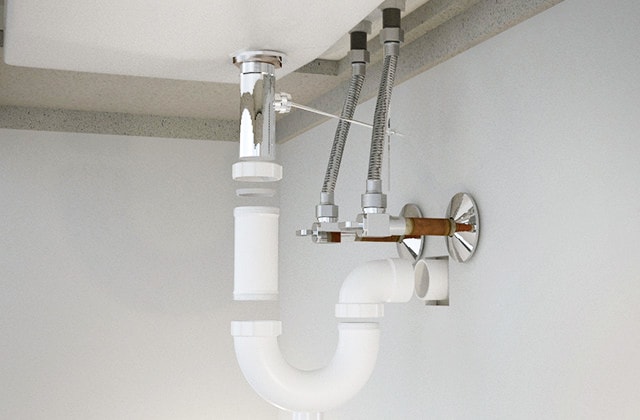
  • 4.4 - Connect the drain pipe to the wall pipe.
  • 4.5 - Fit gaskets onto the ends of the connectors.
  • 4.6 - Strengthen with slip nuts, tightened with a pipe wrench.
  • 4.7 - Tighten screws under the sink to solidify but do not over-tighten, which can cause porcelain to crack.
  • 4.8 - Use a cloth to wipe away any excess sealant.
5

Connect the water

  • 5.1 - Connect the ends of the flexible water connectors for the faucet to the shut-off valves, taking care to properly connect the hot and cold water.
  • 5.2 - Hand tighten nuts and finish with an adjustable wrench.
  • 5.3 - Remove the filter cartridge under the mouth of the faucet.
  • 5.4 - Open up the shut-off valve and turn the hot and cold water back on.
  • 5.5 - Let the water run for a minute to evacuate debris and air.
  • 5.6 - Verify that all connections are tight; retighten if necessary.
  • 5.7 - Replace the faucet filter cartridge.

Suggested products