Replace a vinyl panel

Repair exterior vinyl siding in three simple steps
To keep your exterior siding in good repair, you need to replace damaged vinyl panels and mouldings as they occur. The good news? All you need is the correct tool, a few hours, and the patience to follow three simple steps. Easy!

Pro Tip

Vinyl siding fades over time. If you need to repair a prominent section – near the front door for example – use a panel taken from an inconspicuous spot such as the back wall. The new panel can then be installed where the difference in colour will be less noticeable.

Cutting and nailing tips

Nailing

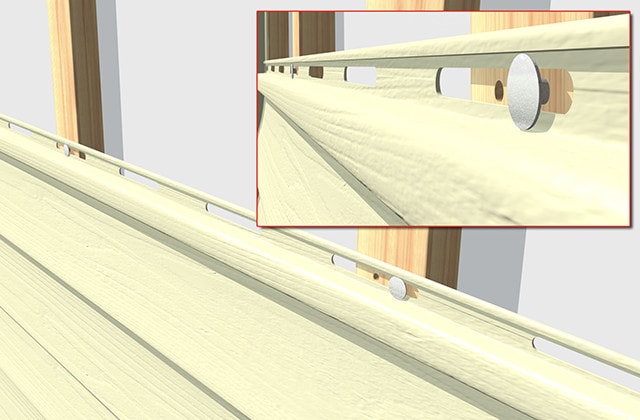
  • Centre nails in slots, spaced at 12" to 16".
  • Drive nails in horizontally.
  • Allow 1/32" between nail heads and vinyl to permit room for expansion and contraction caused by temperature fluctuations.
  • Choose nails with heads at least 5/16" in diameter and shanks 1/8" in diameter.
  • Leave ¼" gaps between siding pieces and trim and between butt ends of adjoining siding pieces.

Cutting

  • Across the width – use a utility knife with retractable blade
  • Across the length – use snips
  • You can also use a circular saw with a fine blade.
Removal of the damaged section
1

Remove the damaged vinyl panel

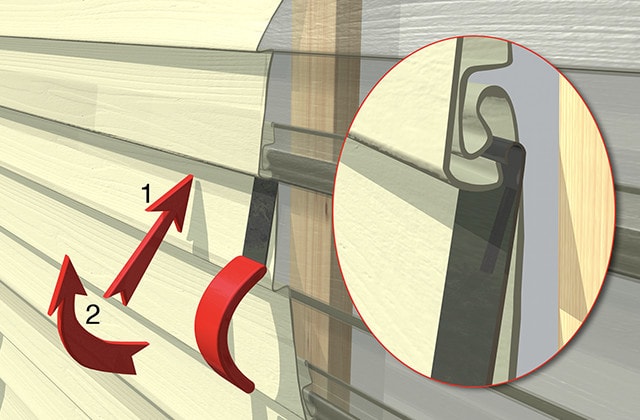
  • 1.1 - Before installing vinyl siding on a wall, push the "Sideswiper" siding removal tool up into the centre of the J-channel of the damaged panel to loosen the section above.
  • 1.2 - Pull downward and out to unhook the bottom lip, then slide the Sideswiper from end to end, pulling the panel out as you go. Leave the upper section, corner edges and mouldings in place.
  • 1.3 - Arracher ou couper les clous qui maintiennent le panneau à la fourrure.
  • 1.4 - Push the damaged panel down to disengage the upper lip.
Measure and cut the replacement panel
2

Cut the new vinyl panel

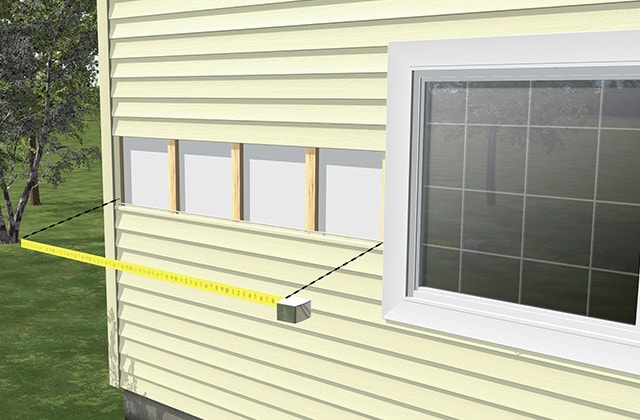
  • 2.1 - Measure the length of the section of siding to be replaced.
  • 2.2 - Add at least 1½" of overlap on each side to allow for expansion.
  • 2.3 - Using a square, score a cutting line with a utility knife. Bend back and forth until it snaps on the scored line.
  • 2.4 - If necessary, use snips to cut around elements.
  • 2.5 - Set with silicone sealant if nailing is too difficult
Installing the replacement panel
3

Install the new panel

  • 3.1 - Align the new panel with the 1½" overlap on each side.
  • 3.2 - Insert the lower edge of the panel into the J-channel of the section below.
  • 3.3 - Nail the panel to the furring, starting in the centre. Space them every 12". Nail in the centre of the nailing slots and leave 1/32" between nail heads and vinyl to allow for expansion. You may use a pry bar or nail punch to help.
  • 3.4 - Insert the Sideswiper in the J channel of the upper panel.
  • 3.5 - Pull the lip down of the upper panel and snap into place.
  • 3.6 - Ensure that the siding lip doesn't rest directly on the lower section of the J channel. There must be space for the vinyl to expand.
  • 3.7 - Make sure all panels are secure.

Suggested products